Often a user needs not just an Android emulator, but one that will work quickly. And despite the fact that the performance of different emulators is usually not very noticeable, MuMu App Player is the best free emulator for weak PCs and laptops, and it perfectly supports most modern games.
This article is about installing and using MuMu App Player on a computer for Android games and other tasks, functions and settings of the emulator, as well as some nuances of running the emulator that may be important.
How to download and install MuMu App Player
You can download MuMu App Player from one of two available official sites - https://mfilecloud.com/bWdpbmt3cHVfa3E3amE%3D
- The specifications of your PC or laptop will be checked. If there are problems that prevent the emulator from starting, you will be prompted to fix them. The main thing that can interfere: disabled virtualization (VT-x, AMD-v) in BIOS / UEFI or included Hyper-V and Windows Sandbox components. Frequent problems are discussed later in this article.
- If no compatibility problems are found, the necessary files will be downloaded and installed. At the same time, it will be proposed to install additional components for the emulator to work: I do not recommend removing marks.
Upon completion of the installation process, the Android emulator will be ready to launch.
Games in the MuMu App Player Android emulator on the computer, settings, speed, functions
After starting the MuMu App Player emulator, you will see the familiar “desktop” Android version 6.0.1. Among the installed applications, there is already a Play Store for downloading games (but you can install the APK files directly from Windows or by downloading them to the emulator, the application files themselves can be downloaded using the methods in this guide: How to download the APK of games and applications for Android ). From what is striking in comparison with other emulators - separate tabs for running applications.

With a high probability, right after installing the right game or program, you can start playing it: moreover, for many popular games, the control settings are already set: for example, after launching popular shooters such as PUBG or Call of Duty Mobile, you will immediately see the display of keyboard keys on the screen to control the necessary elements.
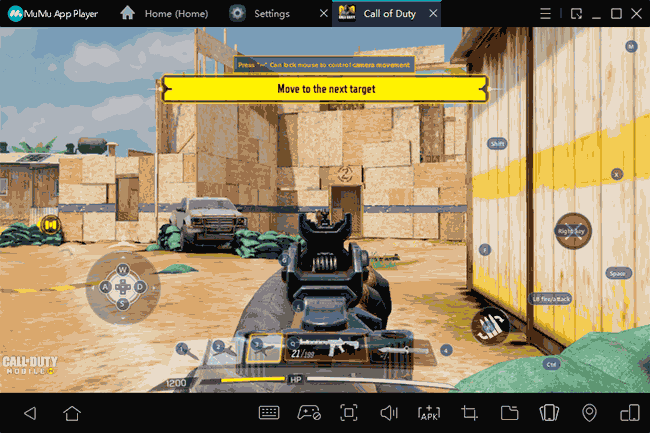
Of course, control in games with the keyboard and mouse can be configured in the way you need for each game separately: all this is done in the keyboard settings by the corresponding icon in the bottom panel of the Android emulator, and gamepads are supported.
In my test, only a few tested games worked completely fine (but I missed those for which you must enter via Google Play, because I think that using personal accounts in emulators is not a good idea). Those that started were executed relatively quickly. But: specifically on my laptop with integrated graphics, the Android LDPlayer emulator showed the best results (besides, for someone it may be important that it is in Russian). Perhaps someone will be interested in the result of the emulator in GeekBench with standard settings on a laptop with a 2-core i5. In general, not bad, at the level of not entirely new, but top-end smartphones.

Settings and features
To begin, I recommend that you enable the Russian language of the operating system interface (provided that English is not suitable for you), the choice of language will also affect the language of the launched games:
- Go to the System Apps section, select Settings.
- Go to “Language & Input” and in “Language” select “Russian”.
- The Android OS interface will change to Russian, and the keyboard will be switched by the same key combination as on Windows (in my case, Ctrl + Shift).
- The interface of the emulator itself (settings, etc.) in Russian is not available, at least at the time of writing the current review.
Next, I recommend going to the settings of the MuMu App Player emulator itself (for this, click on the menu button at the top right and select “Settings”, there you will find the following main parameters:
- On the Basic tab , you can select a language, a shortcut key to quickly hide the emulator (Boss key), start automatic disk cleanup inside the emulator, associate APK and XAPK application files with the emulator (so that they automatically install when you open them on Windows in the emulator) and enabling root access (Enable root permission).

- Advanced tab - selects the graphics mode (speed mode and DirectX or compatibility and OpenGL), performance parameters (choice of the number of processor cores and the amount of RAM). Graphics rendering acceleration (Rendering acceleration).

- Interface - resolution of the emulator window, FPS limit (it can be very useful on weak PCs - if you set FPS to 30, it feels like everything can start working faster than with the set 60 and jumping frame rates), the emulator screen brightness.

In the bottom panel of the emulator you can find the buttons mentioned above for configuring keyboard and mouse controls, a gamepad, for installing the APK or opening a shared folder with the computer (stored in the “Documents”), simulating a device shake and setting the location, changing the emulator screen orientation.
Possible problems during installation, launch and operation of MuMu App Player
First, about the problems you may encounter if the emulator starts up successfully:
- The language settings in Android may be reset upon restart.
- Some games crash without any error messages; not all APKs install successfully. Although according to reviews by other users, these same games work for them, so maybe the problem is local.
Further, in case the emulator does not install or does not start after installation:
- If you have Windows 10, be sure to go to Control Panel - Programs and Features - Turn Windows features on or off. Make sure Hyper-V and Sandbox are disabled. If not, disconnect and be sure to reboot after removal. Moreover, the previously described method for running Android emulators without disabling these components does not work in the case of this emulator.
- Make sure that virtualization is enabled in the BIOS / UEFI of the computer. Usually the function is called Intel Virtualization Technology, VT-x, AMD-v and is located on the Advanced tab.
- If the emulator freezes during installation, make sure that the firewall or your third-party antivirus does not block the installer from accessing the Internet (or temporarily disable the firewall functions).
- If the emulator freezes at startup, at a command prompt as an administrator, enter the command
bcdedit /set hypervisorlaunchtype off
(by pressing Enter after entering) and restart the computer.
As a result, specifically in my test, the Android MuMu App Player emulator was neither the most stable nor the fastest; in my case, the Nox App Player and the previously mentioned LDPlayer won on the same hardware. But it is possible that in your case the picture will be different.