TeamViewer is designed for remote access to a remote computer. When using the program, the user remotely controls another computer via the Internet.
Using TeamViewer will help in solving any problems with another computer, which is located anywhere else. It will be possible to provide assistance in setting up a remote computer, and it will also be possible to control your computer from another place.
Content:
- Install TeamViewer
- TeamViewer Settings
- Remote control your computer
- Remote access to a remote computer
- File Transfer to TeamViewer
- Communication through TeamViewer
- Record video in TeamViewer
- Conclusions of the article
For this, it will be necessary to fulfill only two conditions: partner computers must be connected to the Internet and TeamViewer must be running on them simultaneously. When using the program, data is encrypted, a secure connection will be established between computers.
After starting the program on the local and remote computers and establishing a connection between them, the user can proceed to control the remote computer. Thus, it will be possible to configure the remote computer, provide assistance in solving problems, provide support, show work in programs, etc.
TeamViewer is free for non-commercial use. This program does not even have to be installed on a computer. It will be enough just to run the executable EXE file, and then you should choose the way to start the program.
Naturally, if necessary, TeamViewer can be installed on a computer. After registering with TeamViewer, the user will have administrative rights.
On the official website of the German company, the developer of TeamViewer, versions of the program designed for operating systems are available for download: Windows, Mac OS, Linux, Android, iPhone, iPad, Windows Phone. The Russian version of the program is offered for download.
The popularity of the program is indicated by the fact that TeamViewer has already been downloaded more than 200 million times.
After downloading, the program can be installed on the computer. At the same time, TeamViewer is ready for use without installing on a computer.
Install TeamViewer
To start the installation or launch the program, you will need to click on the executive file in the ".exe" format.

Next, the "Install TeamViewer" window will open. In this window you can select the desired option - “Install”, “Install, then to delete this computer remotely” or “Only start”.
To run the program without installation, select the option “Run only”.
In all cases of using the program, it will be necessary to mark the item “personal / non-commercial use”.
If you select the checkbox next to the item "Show advanced settings", then when installing the program on the computer several additional windows will be opened.
After choosing TeamViewer installation settings, click on the “Accept - Finish” button.

Next, the files are copied. After this process is completed, TeamViewer starts up. When you simply start, copying files does not occur.
First, a window with help information on how to use TeamViewer will open.

Then the main window of the TeamViewer program opens in the “Remote control” tab. In the central part of the program window there are two panels: “Allow management” and “Manage computer”.
At the top of the window are the program menu items: "Connection", "Advanced" and "Help".

If you click on the “Computers and Contacts” button, an additional window will open, from where you can, after registering with TeamViewer, manage computers and contacts, without having to remember IDs and passwords.

TeamViewer Settings
You can enter the program settings by going to the "Advanced" => "Options" menu path. TeamViewer is already configured by default and ready to use. If necessary, then you can customize the program to your needs.
In the “Basic” tab, you can select a display name, network settings, associate a device (computer) with a TeamViewer account.

In the "Security" tab, you can add a personal password for access without confirmation. For a random password, you can set the strength. By default, standard mode (4 digits) is turned on. You can increase the reliability of up to 10 characters, or even disable a random password.
You can also change the rules for connecting to your computer.

By entering the “Remote control” tab, you can change the display settings. Here you can select the display quality of the remote computer screen, display wallpaper on the remote computer in the program window.
With a low speed Internet connection, displaying wallpapers will slow down the session, therefore the option “Hide wallpaper on the remote machine” is activated by default.
In TeamViewer, you can record a remote session.

With the help of TeamViewer it will be possible to hold conferences among several participants.
Remote control your computer
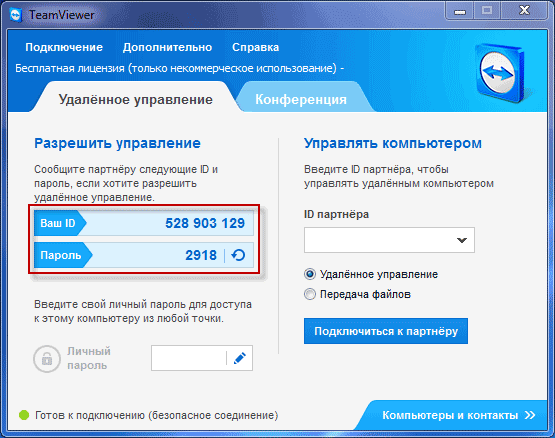
The “Allow management” panel is used to display data for remote control of your computer. There is information about the ID of this computer in TeamViewer, and a password is displayed that can be changed if necessary.
In the "Personal password" field, you can enter your password to access a specific computer from anywhere.
You will need to transfer your ID and password to your remote partner, who will remotely control your computer.
After connecting to your computer and entering the data received from you, your remote partner will manage your computer.
Remote access to a remote computer
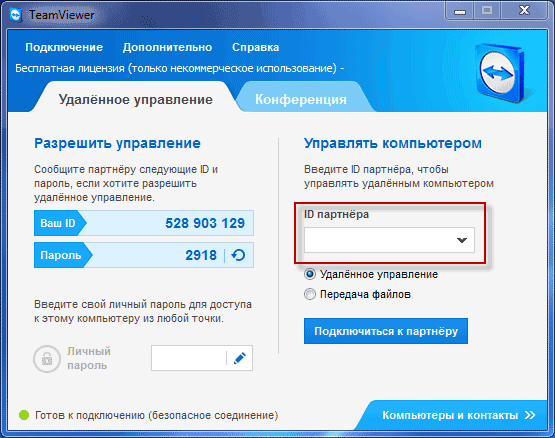
In the main window of the program, on the right side, there is the “Manage computer” panel, which is designed to enter data from another computer.
In the "Partner ID" field, you will need to enter the partner ID. This data (ID and password), you must first obtain from the user of the remote computer that you are going to manage.
In this case, the item "Remote control" should be activated. After that, click on the button “Connect to a partner”.
After that, the “TeamViewer Authentication” window opens. In this window, in the "Password" field, you will need to enter the received password, and then click on the "Login" button.

On the screen of your monitor you will see a window in which the desktop of your partner’s remote computer is displayed. By default, the desktop will turn off the display of wallpaper.

At the top is the "toolbar." Using the toolbar menu commands, it will be possible to control and configure the program without going directly into the settings.

The Actions menu has the following commands:
- “Switching sides with a partner” - in this case, you will exchange management with a partner. Now your partner will manage your computer.
- “Ctrl + Alt + Del” - transfer control of keyboard shortcuts to the partner’s computer.
- “Enable computer lock” - the partner’s computer will be blocked.
- “Remote reboot” - “Ending the session”, “Reboot”, “Reboot in safe mode”. You can end the session or restart the remote computer in the desired mode.
- “Transfer keyboard shortcuts” - the keyboard shortcuts that you press on your computer will be transferred to the remote computer.
- “Block input means of the remote machine” - the mouse and keyboard will be blocked on the remote computer.
- “Show black screen” - on the partner’s computer a black screen will be displayed and he will not be able to see what you are doing on his computer. In this case, the function "Block input means of the remote machine" must be active.
From the Windows menu, you can configure the display of commands and buttons for the Windows operating system.
The View menu controls the view settings.
Using the Audio / Video menu, you can control computer sounds, video, voice, and chat.
The File Transfer menu is responsible for transferring files using TeamViewer.
In the "Advanced" menu are other program settings. You can switch to full screen mode or minimize the toolbar.
After connecting, you can proceed to control the remote computer. It will be possible to install or uninstall programs, view documents, perform various actions to configure the operating system or programs.

Through TeamViewer, you can not only directly control the remote computer, but also share files.
File Transfer to TeamViewer
To do this, on the toolbar, you can click on the "File Transfer" menu button, and select "File Transfer" from the context menu. After that, the “File Transfer” window opens, divided into two windows. In the left window are the files of the local computer, and in the right window - the remote.
To send a file or folder, you will need to select the necessary object on the computer from which the transfer will be carried out, using the "Address" field. After selecting the object, you will need to click on the "Submit" button. First, on the received computer, using the "Address" field, you should select the place where the file or folder will be transferred.

You can also move files using the "File Storage". You can open the file storage window from the “file transfer” menu or from the side window of the program by clicking on the corresponding icon.
You will need to drag the file, on the computer from where you will move the files to the storage, to the "File Storage" window.
In this image, you can see that the file was placed in the file storage on a remote computer (dark window). After moving, the file became available on the local computer (bright window).

Communication through TeamViewer
In TeamViewer, you can exchange chat messages, negotiate voice calls, conduct telephone conferences, and record video during communication.

In the program, you can take screenshots of the remote computer window.
Record video in TeamViewer
In order to record a video session you need to enter the “Advanced” menu, go to the “Record” item in the context menu. Here are the items for managing the recording of the Start, Pause and Stop video.
Using these commands, you can record a video file on which your actions will be displayed in the window of the remote computer. After recording, the video file will be saved in the “.tvs” format. This file can be converted to the “.avi” format to be able to view it on any computer.
To do this, go to the main program window, open the "Advanced" menu, and select "Play or convert recorded session ..." in the context menu. After that, the “Open” window will open, in which you should select a video file with the extension “.tvs”.
Next, on the top panel, click on the "Convert" button.
In the "Convert Session Record" window that opens, click the "Convert" button. If necessary, you can change the conversion settings before starting the process of converting a video file. To do this, you will need to click on the "Configuration ..." button, and then in the window that opens, change the settings.
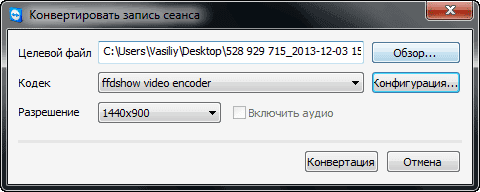
Next, the conversion of the video file to the “.avi” format will start.
After the conversion is complete, you can play the recorded video session using a regular player.
Conclusions of the article
TeamViewer allows you to remotely access your computer, with it you can share files and manage a remote computer to assist your partner.